How to read a DMARC report—and actually understand it!
 Amy Elliott

The issue? The reports come in dense xml messages that are tough to understand. And even if you can decode them, staying on top of new reports is a full-time job for people who send a lot of emails.
This guide will help. We’ll explain more about DMARC, tell you how to get set up, show you how to read your DMARC reports, and highlight an easy way to monitor your messages over time. Let’s get down to business.
What is DMARC?
DMARC (Domain-based Message Authentication, Reporting, and Conformance) is an email authentication and reporting protocol that helps domain owners monitor and manage how their domain is used for email sending.
The biggest benefit of DMARC is that it helps identify and stop domain spoofing, which is when cyber criminals send emails that look like they come from your domain. Setting up DMARC reduces the chances of this happening and helps you take action faster if it does.
DMARC enables two tools to keep your domain secure:
Give receiving email servers instructions for how they should handle emails sent from the domain that fail SPF or DKIM policy checks
Provide reporting mechanisms that let domain owners receive feedback about emails sent from their domains
This protects the domain owner from email spoofing, and email recipients from spam and phishing messages that claim to be from a domain they’re not.
Having a DMARC policy set up is also a key requirement of recent updates to how Gmail and Yahoo Mail process mail from people who send over 5,000 messages a day from one domain. If you send this number of emails, you must set up DMARC.
What are DMARC reports?
DMARC reports are documents that provide information about emails sent from a particular domain.
These documents are automatically generated by the receiving mail server. They contain information such as the percentage of emails sent to the server that failed DMARC authentication, the sources of these emails, and even parts of the email content.
There are two types of DMARC reports: forensic reports which go into detail on specific DMARC failures and aggregate reports which summarize DMARC activity for a defined period.
Forensic reports
DMARC forensic reports contain information about individual email messages that fail authentication.
This report is sent to the email address you specify in your DMARC record. They contain information that can help you to identify and verify legitimate email sources and block unauthorized ones.
The report includes:
From email address
Recipient email address
Email source IP address
SPF or DKIM authentication results
Email subject line
Email headers (Learn how to read and understand email headers)
Time email was received
Although they do contain useful information, forensic reports are not widely implemented by Internet Service Providers (ISPs), so are a lower priority when it comes to DMARC monitoring.
Aggregate reports
DMARC aggregate reports provide information in xml format about the DMARC, SPF or DKIM authentication status of all emails that go through the authentication process. This report is sent to the email address you specify in your DMARC record.
Unlike forensic reports, aggregate reports do not contain any sensitive information, but they do provide insights crucial for monitoring your domain sending activity, including:
Information about the Email Service Provider (ESP) including domain and email address
Date range
Email source sending IP address
Number of messages sent
SPF domain
SPF authentication result
SPF domain alignment result
DKIM domain
DKIM authentication result
DKIM domain alignment result
Policy applied by the receiver
By parsing this information, you can get an overview of sending on your domain during the previous period, helping you to identify suspicious activity.
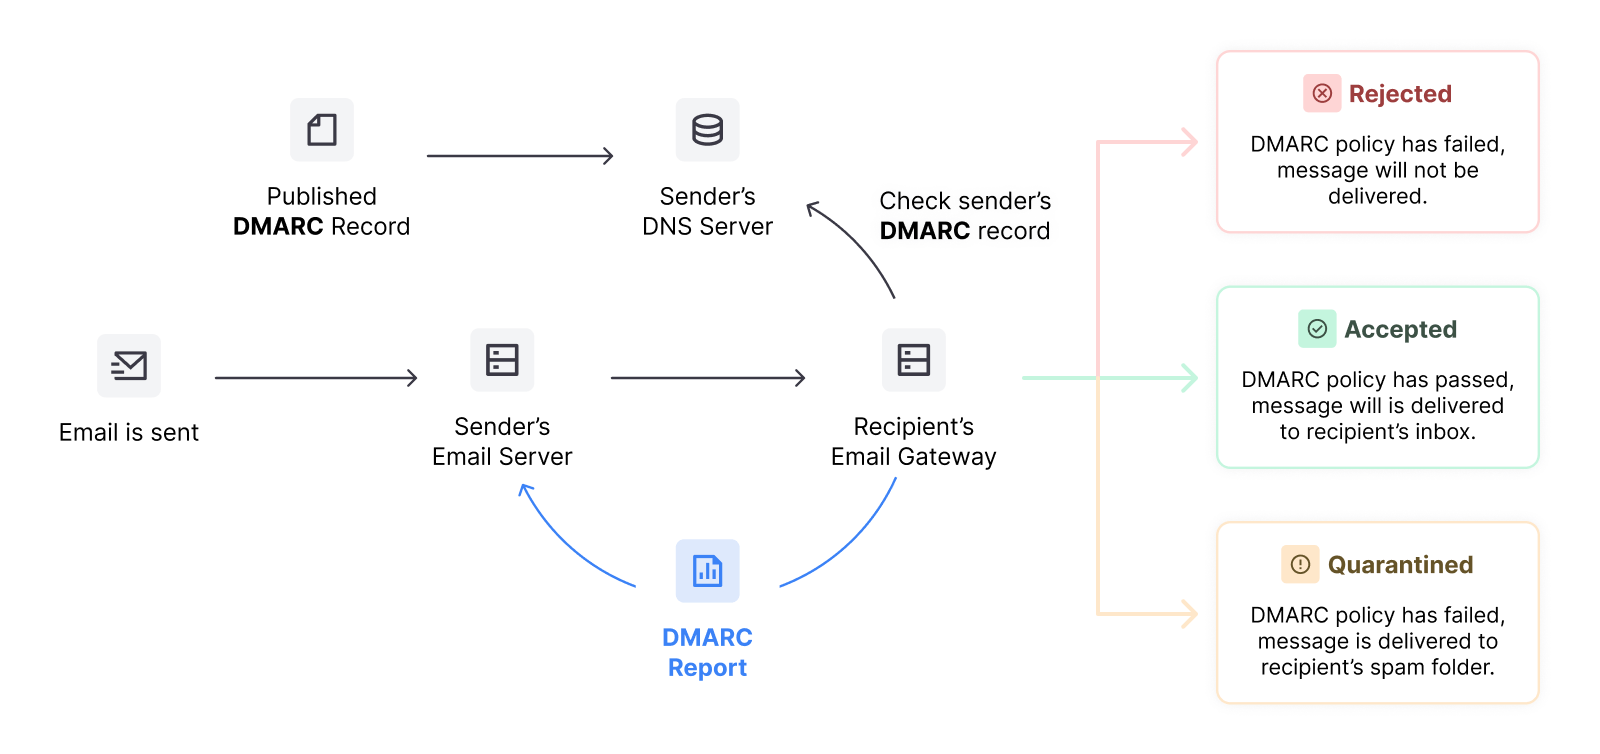
How DMARC reporting works
When an email sent from your domain fails an SPF or DKIM check, the recipient mail server will check your DMARC policy for further instructions about both what to do with the message and how to create the report.
Your policy uses tags to provide information to the recipient server such as:
In what situations to create a report
The email address to send the reports to
The frequency it should send reports
The format of the report
The recipient server will then take action based on what your policy says. The graphic below shows the process in action.
How to enable DMARC reporting
You can enable DMARC reporting by adding your policy to your DNS zone. Do this by configuring SPF and DKIM, defining your DMARC policy and then publishing the record in your DNS.
Follow the below steps to get set up:
1. Configure SPF and DKIM
DMARC policies define what servers should do when your emails fail SPF and DKIM checks. You first need to set up these records if you haven’t already.
Your email service provider will typically make it easy to create these records and provide instructions for how to use them.
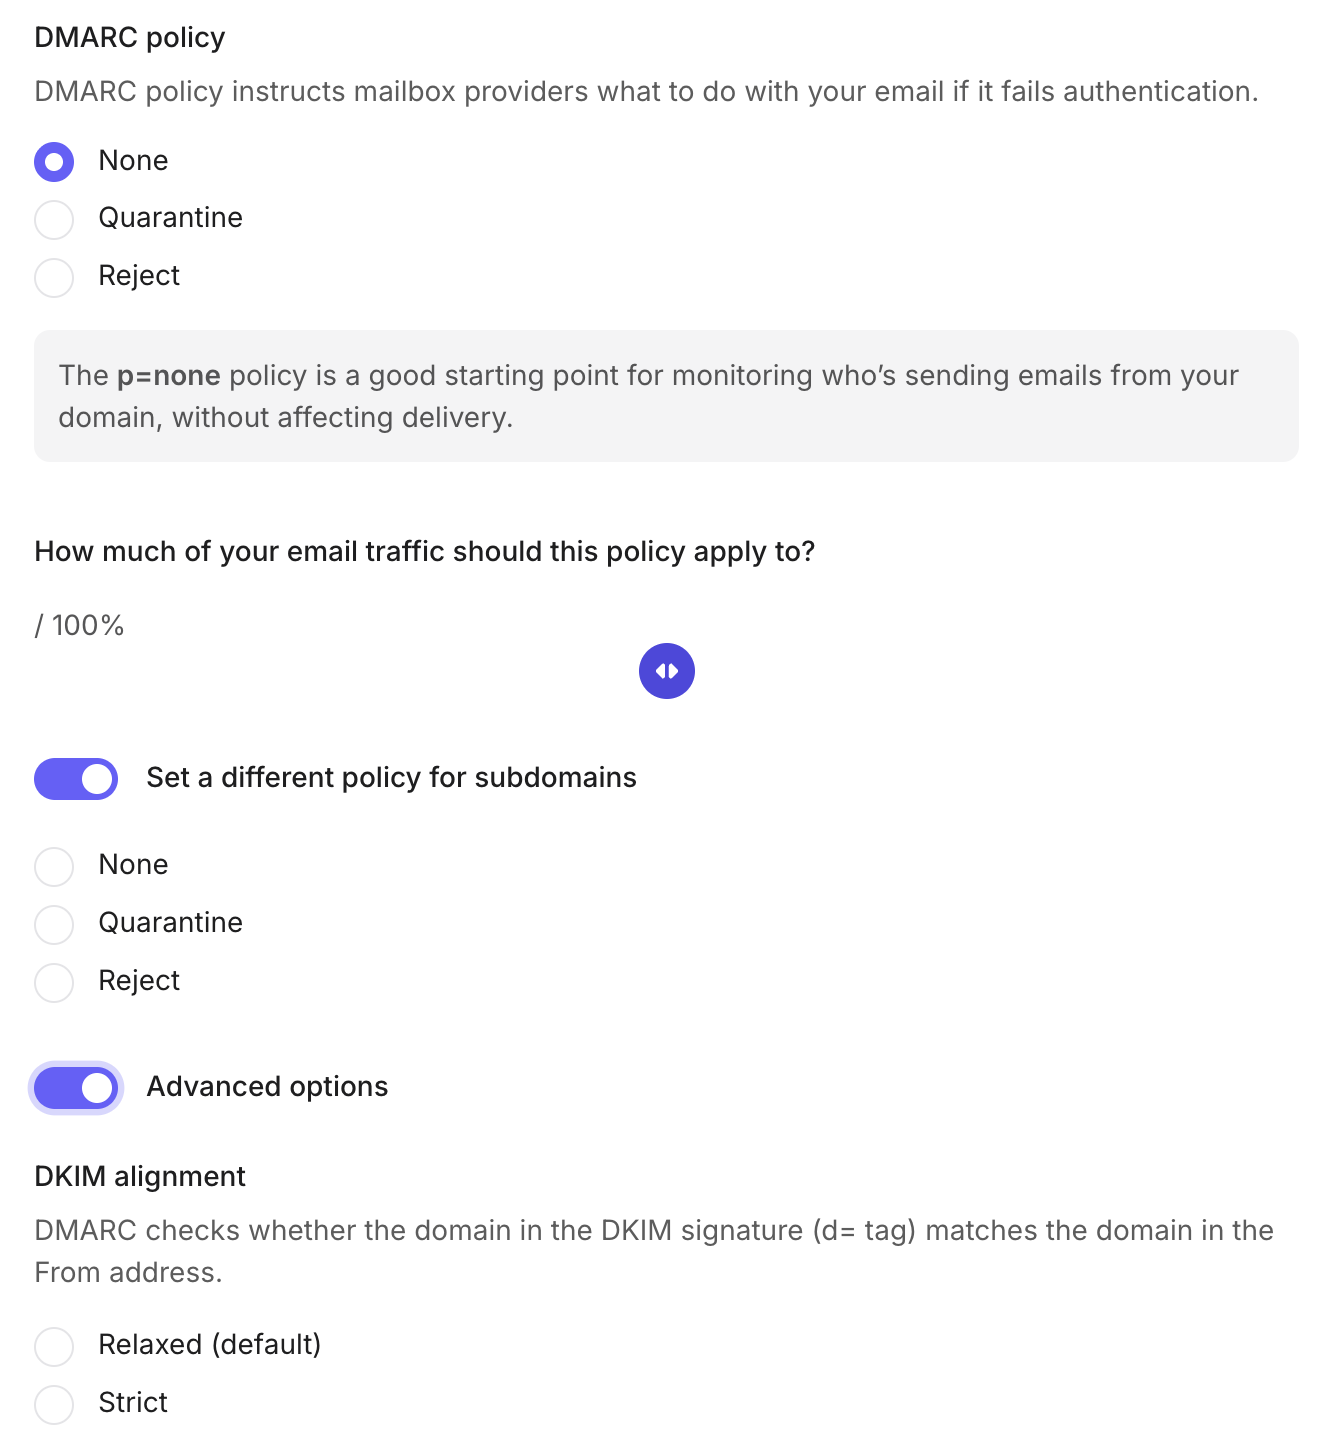
2. Define your DMARC policy
Create a DMARC policy that defines what you want to do with emails that fail SPF and DKIM checks and how you want to receive your reports.
The policy should specify 5 things:
The version of DMARC you use: v=DMARC1
What to do with emails that fail the checks: Send to spam (p=quarantine), reject (p=reject) or take no action (p=none)
The email address to receive aggregate reports: [email protected]
The email address to receive forensic reports: [email protected]
When to generate a report. If a SPF or DKIM check fails (fo=1), if both SPF and DKIM fail (fo=0), or when SPF fails (fo=s)
This will result in a policy that looks like the following text.
v=DMARC1; p=reject; rua=mailto:[email protected]; ruf=mailto:[email protected]; fo=1
See more information about these tags—and others you can add to provide more information to recipient mail servers—in the table below.
| Tag | Description |
|---|---|
| Version (v) | The v tag specifies the protocol version and is a required tag. |
| Policy (p) | The p tag specifies the policy that should be followed for the domain. The possible values are none, quarantine or reject. |
| Subdomain policy (sp) | Similarly to the p tag, sp specifies the policy that should be followed for subdomains. |
| Percentage (pct) | The pct tag specifies the percentage of emails that should be subjected to filtering. |
| Forensic report email address (ruf) | The ruf tag lets you define the email address that forensic reports should be sent to. |
| Aggregate report email address (rua) | With the rua tag, you can define the email address that aggregate reports should be sent to. |
| SPF alignment mode (aspf) | Defines whether SPF domain alignment should relaxed or strict. |
| DKIM alignment mode (adkim) | Defines whether DKIM domain alignment should relaxed or strict. |
| Forensic reporting options (fo) | Defines how forensic reports are created and given to users. |
| Report format (rf) | The rf tag defines the forensic reporting format. |
| Report interval (ri) | This tags enables you to change the frequency of your reports. |
You can also use free online tools to generate a policy based on your needs in a couple of clicks.
Try MailerSend’s DMARC policy generator by creating an account and heading to the DMARC tab.
3. Publish the policy
Now you have your record, you can add a TXT record to your DNS record that includes the policy you created above.
The name of the record is _dmarc followed by your domain, while the value is the policy generated in the step above.
That will result in the following:
Name: _dmarc.yourdomain.com
Value: v=DMARC1; p=reject; rua=mailto:[email protected]; ruf=mailto:[email protected]; fo=1
Once you’ve followed these steps, you’ll start to receive emails from email servers containing your reports.
At this point, you can also use a DMARC reporting tool to analyze all the incoming reports and summarize the essential information, making it much easier and less time-consuming to stay on top of your reports.
How to read DMARC reports
It can be difficult to interpret the information in a DMARC report. To show you how it’s done, let’s look at an example of an aggregate report and break down the different elements and take a look at what they mean.
Example report
<?xml version=”1.0″ encoding=”UTF-8″ ?>
<feedback>
  <report_metadata>
    <org_name>google.com</org_name>
    <email>[email protected]</email>
    <extra_contact_info>
    http://google.com/dmarc/support
    </extra_contact_info>
    <report_id>7598769364592857643</report_id>
    <date_range>
      <begin>1632654984</begin>
      <end>1633749852</end>
    </date_range>
  </report_metadata>
  <policy_published>
    <domain>yourdomain.com</domain>
    <adkim>r</adkim>
    <aspf>r</aspf>
    <p>none</p>
    <sp>none</sp>
    <pct>100</pct>
  </policy_published>
  <record>
    <row>
      <source_ip>192.158.1.38</source_ip>
      <count>2</count>
      <policy_evaluated>
        <disposition>none</disposition>
        <dkim>fail</dkim>
        <spf>pass</spf>
      </policy_evaluated>
    </row>
    <identifiers>
      <header_from>yourdomain.com</header_from>
    </identifiers>
    <auth_results>
      <dkim>
        <domain>yourdomain.com</domain>
        <result>fail</result>
        <human_result></human_result>
      </dkim>
      <spf>
        <domain>yourdomain.com</domain>
        <result>pass</result>
      </spf>
    </auth_results>
  </record>
</feedback>
This first section of the DMARC aggregate report contains information about the ISP (in our example it’s Google) including its domain and email address.
<?xml version=”1.0″ encoding=”UTF-8″ ?>
<feedback>
  <report_metadata>
    <org_name>google.com</org_name>
    <email>[email protected]</email>
   <extra_contact_info>
   http://google.com/dmarc/support
   </extra_contact_info>
Next up, it’s the report ID.
<report_id>7598769364592857643</report_id>Here we have the date range of the report. If it looks a little confusing, that’s because it’s in seconds. To convert a timestamp to a date, you can use this timestamp converter.
    <date_range>
      <begin>1632654984</begin>
      <end>1633749852</end>
    </date_range>
These are the DMARC policy specifications. Domain refers to your domain name, adkim refers to the alignment mode for the DKIM protocol—in this case, r refers to relaxed mode. Similarly, aspf refers to the alignment mode for the SPF protocol. p is the policy tag, indicating which policy the receiver should employ: none, quarantine or reject. Correspondingly, the sp tag defines the policy for subdomains. And finally, the pct tag indicates the percentage of emails that should be subjected to filtering in the DMARC policy.
  <policy_published>
    <domain>yourdomain.com</domain>
    <adkim>r</adkim>
    <aspf>r</aspf>
    <p>none</p>
    <sp>none</sp>
    <pct>100</pct>
</policy_published>Next we have the IP address of the sending source.
<source_ip>192.158.1.38</source_ip>Here are our email authentication results. In this instance, we can see that DKIM authentication has passed while SPF authentication has failed. Disposition tells us which policy the receiver followed in the event of DKIM/SPF failure, in this case, none.
      <policy_evaluated>
        <disposition>none</disposition>
        <dkim>pass</dkim>
        <spf>fail</spf>
      </policy_evaluated>
Here we can see the domain specified in the email header.
    <identifiers>
      <header_from>yourdomain.com</header_from>
    </identifiers>
Finally, here are the individual DKIM and SPF results. The human_result tag allows for an optional error message to give context to the failure where the error may not be obvious. For example, if there is a syntax error in the record.
     <auth_results>
      <dkim>
        <domain>yourdomain.com</domain>
        <result>pass</result>
      </dkim>
      <spf>
        <domain>yourdomain.com</domain>
        <result>fail</result>
        <human_result></human_result>
      </spf>
    </auth_results>
Easily stay on top of DMARC reports with a monitoring tool
Manually analyzing your DMARC reports and email logs by digging into the xml reports is possible, but it isn’t the most efficient way to monitor DMARC.
By using a DMARC monitoring tool like MailerSend, you can automate the monitoring and reporting of the status of your DMARC implementation.
Even better, in addition to notifying you about your latest DMARC report, MailerSend will give you insights into what you should do next to fix any issues.
If DMARC monitoring isn't enough, MailerCheck has plenty more features to help with email deliverability optimization. You can verify your email list, use the API to implement real-time email validation on your website or app, check and optimize your email content, and test for inbox placement.
Try MailerCheck for free
Sign up for free and receive 10 credits to get started with and access to all tools!
5 Benefits of DMARC reporting
DMARC is a powerful tool for authenticating sending sources and protecting your domain. Let’s take a look at a rundown of the benefits.
1. Increased visibility into email activity
DMARC reporting provides a level of visibility that you cannot achieve with your email logs alone. It gives detailed information about the emails being sent from your domain, including the IP addresses and domains that are sending them. This can help you identify any unauthorized use of your domain and take appropriate action.
2. Stronger email security
By implementing DMARC, you can block fraudulent emails from reaching your customers, improving the security of your business email communications. What’s more, by continuously monitoring the status of your DMARC implementation, you can learn in real-time if authentication fails. This gives you the ability to react quickly to attacks and makes your sending more secure. It’s kind of like the security guard of your email.
3. Improved email deliverability and sender reputation
Boosting your email security with DMARC, monitoring its status with reports, and blocking unauthorized sending sources can all help to improve your overall email deliverability and protect your sender reputation.
4. Increased brand protection
No business wants to be associated with spam or phishing attacks! DMARC can help protect your brand by preventing unauthorized use of your domain in email communications.
5. Simplified compliance
Depending on your industry, there might be regulatory requirements related to email security, such as Payment Card Industry Data Security Standard (PCI DSS), that your organization must adhere to. DMARC can help businesses to meet these requirements.
DMARC best practices to keep your domain safe
By now you should have all the knowledge you need to implement DMARC and start monitoring your domain. Before you begin, check out these final best practices to ensure the process goes smoothly.
Start slowly
When creating your policy, start by asking mail servers to take no action when an email fails a DMARC check. This lets you collect data without impacting your email delivery. Use this time to monitor email traffic.
Starting slowly also ensures you don’t accidentally cause legitimate messages to be quarantined or rejected due to an incorrectly set up policy.
Ramp up gradually
Once you understand your regular domain use and are know that your messages are getting through, you can change the policy to quarantine or reject.
Do this gradually by specifying the percentage of emails that the policy is applied to by adding the snipped pct=[your chosen percentage] to your policy record.
Set up subdomain policies
If you use subdomains to send email, you can include this in your DMARC policy by using the “sp” tag followed by the policy you want to take. For example, “sp=quarantine.”
This will cover all subdomains under your main domain. If you want to specify different policies for each subdomain, you’ll have to create individual DMARC records for each one by following the steps in this article and specifying the subdomain in the record’s name.
Use a secure email address for reports
Forensic reports can include sensitive information included in emails. With this in mind, ensure that you only request forensic reports if SPF or DKIM fails and send the reports to a secure email address.
Use a tool to analyze results
Reading all the DMARC reports sent to you is time-consuming. Instead, consider using a DMARC reporting tool to parse all the information in these reports and display it in an easy-to-read way.
The visual reports and notifications provided by these tools give you the highest possible chance of identifying suspicious activity on your domain.
They also reduce the chance of human error, provide action steps you can take to solve issues that arise, and give you a clear historical overview of how domain activity changes.
DMARC my words…
DMARC reporting is essential if you want to manage your email sending like a pro while maintaining your email deliverability. It’s a highly effective and efficient way to gain valuable insights into your domain activity and protect your domain, customers and business while you’re at it. When it comes to email security, no measure is too much!
Do you have any tips for monitoring your domain activity? Let us know in the comments and we might include them in the next update to this article!